top of page

In-law Suite
Home Living
Office Space
Rental Home
Endless Possibilities
OUR MODELS
House Installation Steps and Methods

1.Prepare Site for Delivery
Ensure the site is clear and level, properly prepared for delivery of your new home.

2.Positioning the Home
Place the home on a pre-prepared, secured level surface. Ensure the location is
finalized, as the home cannot be moved after placement.
finalized, as the home cannot be moved after placement.

3.Side Fixed Panel Removal
Once the home is placed, locate the fixed panels on the sides. Loosen the screws
on the fixed panels and slide them outward to free the structure.
on the fixed panels and slide them outward to free the structure.

4.Move the Fixed Panels
After loosening, move the fixed panels to both sides to prepare for further
installation.
installation.

5.Lift the Side Roof
Raise the side roof upwards carefully.

6.Elevate the Top Panel
Lift the top panel and secure it using support rods. Ensure personnel hold the support rods firmly to prevent injuries.

7.Secure the Bottom Latch
Locate the latch on the bottom panel and push it downward to unlock.

8.Lower the Bottom Panel
Slowly lower the bottom panel until it aligns flush with the base frame of the house.

9.Unfold the Side Large Wall
Expand the side large wall to its full position.

9.Unfold the Side Large Wall
Expand the side large wall to its full position.

10.Unfold the Rear Small Wall
Carefully expand the rear small wall into its designated position.

10.Unfold the Rear Small Wall
Carefully expand the rear small wall into its designated position.
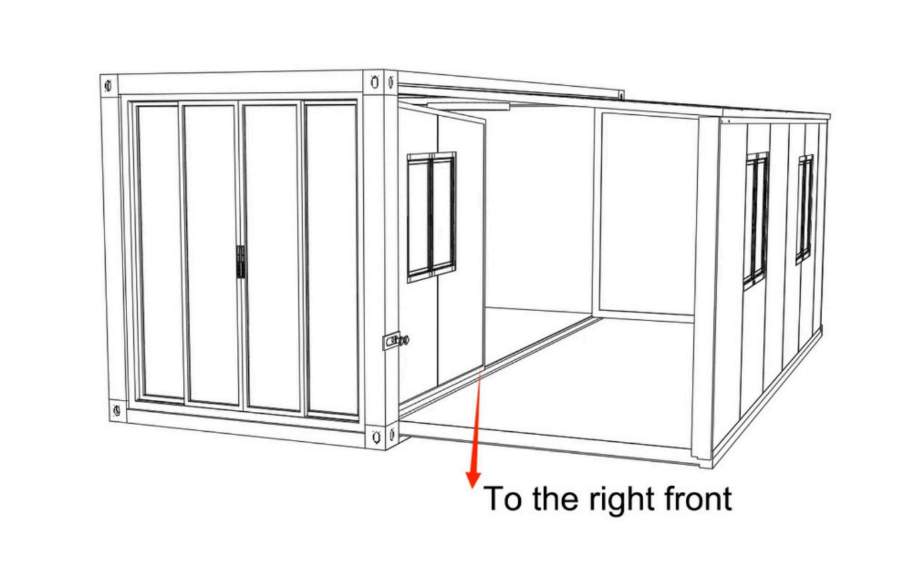
11.Unfold the Front Small Wall
Expand the front small wall and secure it in place.

12.Expand the Left Side of the House
Follow the same steps used for the right side to expand the left side of the house.

13.Screw Holes and Fixing Points
Small Walls: Screw holes are located at the top and bottom of the front and rear
small walls.
Large Walls and Roof: Screw holes are present at designated positions on the left
and right sides.
Tools and Screws: Use the screws and tools as indicated in the provided diagrams.
Ensure all connections are securely fastened.
small walls.
Large Walls and Roof: Screw holes are present at designated positions on the left
and right sides.
Tools and Screws: Use the screws and tools as indicated in the provided diagrams.
Ensure all connections are securely fastened.

14.Installing Yellow Sealing Strips, Structural Adhesive, and Stainless
Steel Panels
Yellow Sealing Strips: Cover the folding seams on the floor with the yellow sealing
strips.
Structural Adhesive: Apply structural adhesive along the installed yellow sealing strips.
Stainless Steel Panels: Press and secure the stainless steel panels over the adhesive to finalize the floor.
strips.
Structural Adhesive: Apply structural adhesive along the installed yellow sealing strips.
Stainless Steel Panels: Press and secure the stainless steel panels over the adhesive to finalize the floor.

15.Using Structural Adhesive and Waterproof Tape
Structural Adhesive: Apply adhesive at the junctions of the side base and side large walls to ensure proper sealing and waterproofing.

15.Using Structural Adhesive and Waterproof Tape
Structural Adhesive: Apply adhesive at the junctions of the side base and side large walls to ensure proper sealing and waterproofing.

15.Using Structural Adhesive and Waterproof Tape
Waterproof Strips: Attach waterproof strips at the seams between the side roof
and the main roof for enhanced waterproof sealing.
(Refer to diagrams for precise application locations.)
and the main roof for enhanced waterproof sealing.
(Refer to diagrams for precise application locations.)

16.Bedroom Light Installation
Install bedroom lighting fixtures according to the provided instructions and ensure all connections are secure.

17.Bedroom Door Lock Installation
Mount and secure the door lock on the bedroom door as per the provided lock assembly instructions. Ensure proper alignment and functionality.

18.Socket and Lighting Switch Installation Guide
(Based on Chinese National Standards. For non-standard configurations, this guide
is for reference only.)
is for reference only.)

18.Socket and Lighting Switch Installation Guide
(Socket Installation Steps:
1. Dismantle the socket to access the installation panel.
2. Locate the wiring holes at the back of the panel. Connect the wires as shown in Diagram 2.
3. Insert the installation panel into the socket box and secure it using installation screws.
4. Attach the front panel by snapping it into place to complete the installation.
(Refer to diagrams for detailed wiring and installation steps.)

18.Socket and Lighting Switch Installation Guide
Lighting Switch Installation
1.Disassemble the Lighting Switch
Begin by dismantling the lighting switch to access the installation panel.
2.Locate the Wiring Holes
On the back of the installation box, you will find wiring holes. Follow Diagram 2 to
correctly wire the switch.
3.Install the Wiring
After connecting the wires, insert the installation panel into the back box.
4.Secure the Panel
Tighten the panel in place using the installation screws to ensure it's securely fixed.
5.Attach the Cover and Front Panel
Once the panel is securely in place, snap the cover and front panel onto the box to
complete the installation.
(Refer to Diagram 2 for wiring details and visual instructions.)
bottom of page